SMS Blog
From Risk to ROI: Encrypt Data In‑Use in AWS
In our first installment of the “From Risk to ROI” series, we introduced the concept of confidential computing and demonstrated how trusted execution environments (TEE) can unlock value from highly sensitive intellectual property without ever exposing raw data.
In this blog, we’ll walk through an application that shows you how to use confidential computing within AWS. You’ll learn how to set up a TEE, securely decrypt and process data, and safely exfiltrate results all while ensuring that no involved party ever gets access to the intellectual property.
Introduction to Nitro Enclave
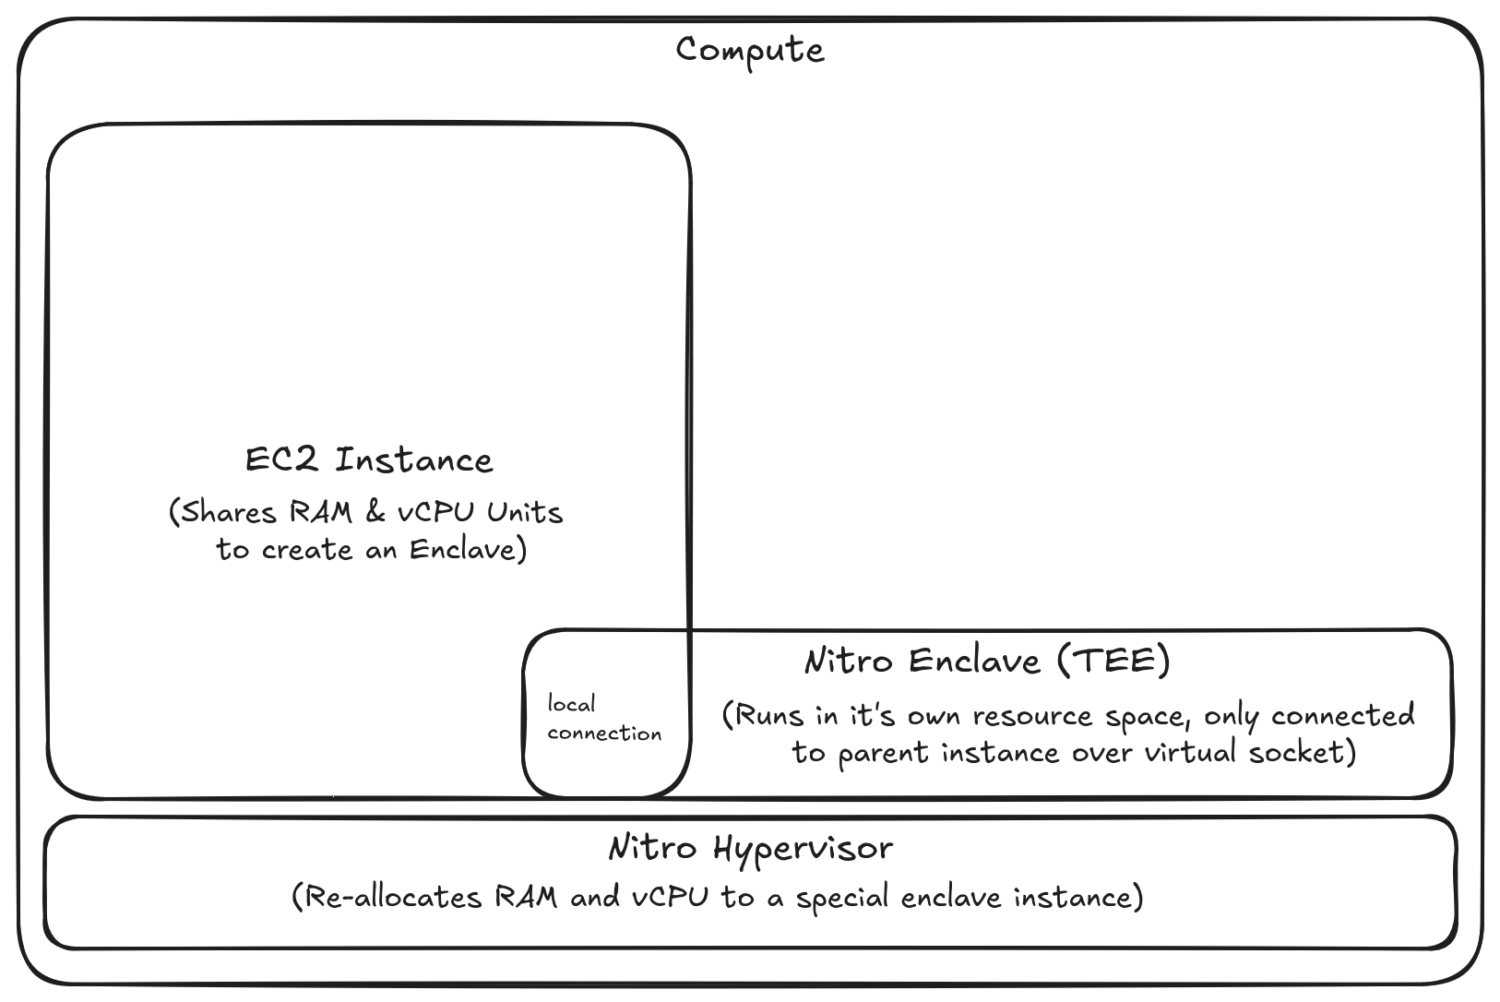
Amazon has developed its own lightweight hypervisor service for EC2 instances known as the Nitro System. This custom hypervisor enables the creation of isolated compute environments called enclaves. These enclaves are provisioned using resources from a parent EC2 instance that creates the enclave but the enclave operates independently on the Nitro System rather than the instance’s host operating system. This architecture ensures that even EC2 administrators cannot access the enclave’s memory or view processing details. Moreover, enclaves have no persistent storage or external network interfaces, significantly reducing potential attack surfaces.

Enclaves are different from hardware-level Trusted Execution Environments that are built directly into the processor, as we explained in our previous blog. Instead of relying on the processor vendor, Enclaves use third-party audits to verify the integrity of the environment. This means the root of trust is placed in AWS’s audited platform rather than in the hardware itself. For some users, this change in trust may be a concern. We will examine those concerns more closely later. For now, assuming this new trust model is acceptable, let us discuss an application that runs inside an enclave.
Proof of Concept Application: Goals and Architecture
Let’s consider a scenario where an organization needs to build an application that processes sensitive intellectual property. Using confidential computing, the organization can securely engage a third-party service provider to develop this application without ever granting them access to the decrypted data.
In this setup, the organization encrypts its data file using a Key Management Service (KMS) and does not share decryption access with the service provider. Here’s how the application will work:
Step 1: From within the enclave, the application will send a request to KMS to decrypt the file content securely. This request will contain cryptographic attestations to prove that the request is generated by the enclave and runs only the operations approved by the data owner organization. KMS shall be set up to allow decryption only when the proper attestation is provided.
Step 2: Perform the task that needs access to the data. In a real-world scenario, this could range from running complex calculations to using AI to generate insights.
Step 3: Send the result of our computation to our result data store. In this example, we are assuming the result is non-confidential. However, if the result were confidential; it would have to be encrypted using KMS before being stored.
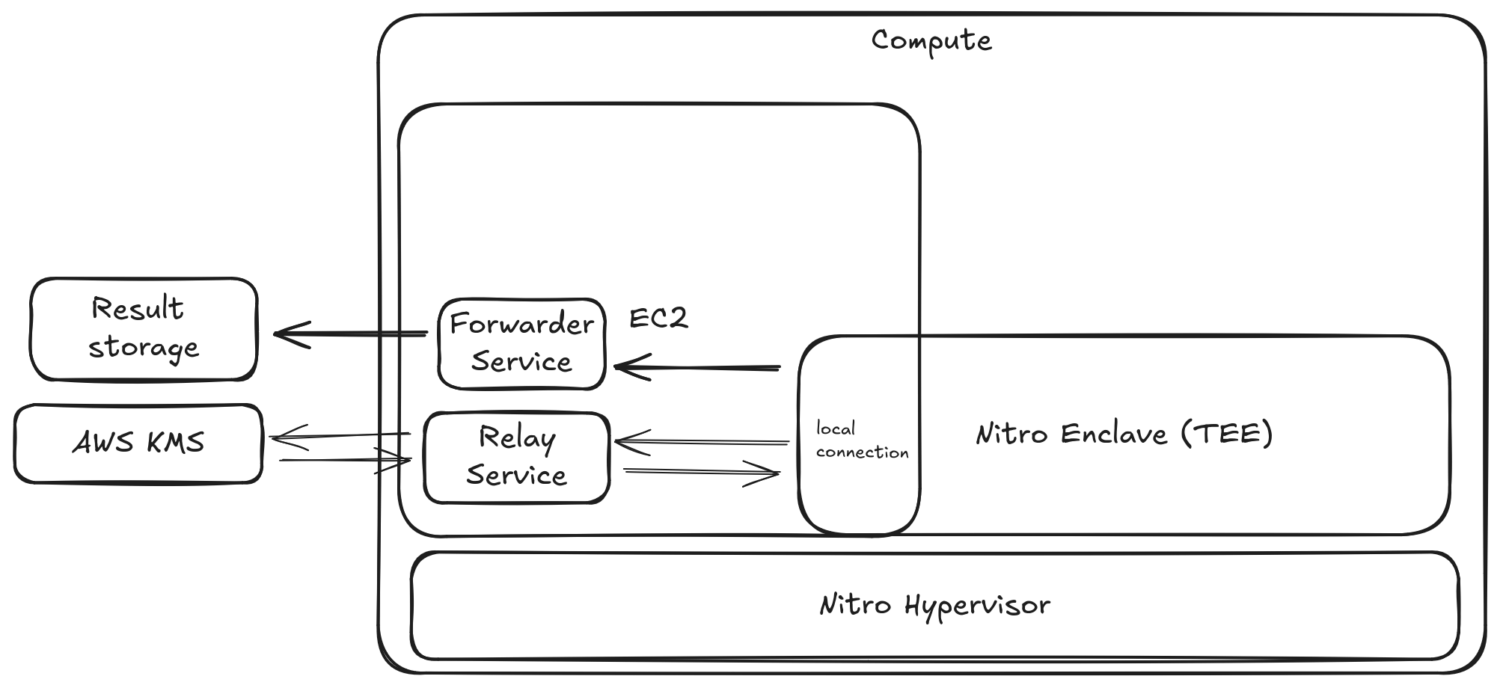
To complete these steps, we will need to create an EC2 instance that supports creation of the enclaves. However, since the enclave is not connected to the outside world, our parent EC2 instance will need to run the following services as well:
- Relay Service: A simple proxy relay service that takes HTTPS requests from within the enclave and forwards them to a specific domain,
kms.us-east-1.amazonaws.comin our case, and returns the response to the enclave without ever decrypting or manipulating any data in the request. This is an example of a secure connection where the parent EC2 instance does not get access to any information inside the request. - Forwarder Service: A simple service that takes data from the enclave, performs additional processing, such as adding headers to the request, and forwards that request to another domain. This service is an example where the parent EC2 instance does get access to the data. This can be useful for further processing of non-confidential data. In our case, we will use the forwarder service to store the result of the computation in our result storage.

The Step‑by‑Step Implementation
Let’s make an assumption that we have built a docker image called enclave-app:latest which is verified and approved by the data owner. This docker image contains:
- Our application that processes the data inside the enclave.
- A KMS relay service that communicates with KMS on a virtual socket (vsock).
Now, without further delay, let’s get into the weeds:
Step 1: Start the parent EC2 instance
Choose an enclave‑capable instance (e.g., c6i.xlarge) and enable Nitro Enclaves.
aws ec2 run-instances \
...other options... \
--instance-type c6i.xlarge \
--enclave-options Enabled=true
Step 2: Prepare the instance to run our enclave
- Install
aws-nitro-enclaves-cliandaws-nitro-enclaves-cli-devel - Install
dockerto pull our docker image to the parent EC2 instance.
Step 3: Configure Relay and Forwarder Services
For relay service, we can use the vsock proxy tool aptly named vsock-proxy included in our dependencies. For forwarder service, assume we have built a forwarder service that is a python based web-server. The forwarder service connects with the internet and listens on vsock for requests.
- Setup Relay service:
# Listens on vsock port 8000 and forwards the request
# to kms.us-east-1.amazonaws.com:443.
# Run the command on a separate terminal in the parent EC2 instance
vsock-proxy 8000 kms.us-east-1.amazonaws.com 443
2. Setup Forwarder service:
# Run the command on a separate terminal in the parent EC2 instance
python3 forwarder.py
Step 4: Build the enclave image
docker pull enclave-app:latest
nitro-cli build-enclave --docker-uri enclave-app:latest --output-file enclave.eif
The build-enclave command will generate an enclave image file enclave.eif and provide us with attestation measurements for the enclave:
{
  "Measurements": {
    "HashAlgorithm": "Sha384 { ... }",
    "PCR0": "a8c3f5bcd95f84d2c8d7fbe34a6ea0e3c0f9736f4f6c27b3e4fa6e97a2cd9a3ebd029c620f70db6a33dbb0c4012a68a2",
    "PCR1": "1fbc2d1a9db986da419ea8ad78198be69dc2d829b5f67b4a08746aa934a9f2e3a931ebd1c1082ae6499c44ebba73f003",
    "PCR2": "b702c3287469d5e6d3a5bcb1ff91e7c98e15e5c14a9b719c7036c317afe73f37a35cb9f5d1b35167b186a7e40b678eed"
  }
}
The PCR0, PCR1, and PCR2 registers are Platform Configuration Registers used to verify the integrity of the enclave. These values reflect measurements of the enclave’s components and will change whenever any part of the enclave is modified. For example, if the docker image enclave-app:latest is changed, the PCR values generated will change as well.
In practice, the service provider builds the enclave in the presence of the data owner. This ensures that the enclave is created using the approved docker image, allowing the data owner to trust that the PCR values reflect a verified and unmodified code base.
Since the data owner has reviewed and approved the enclave-app:latest image. They can trust the PCR values associated with the enclave built from this image. Based on this trust, the data owner can configure the following KMS policy to allow decryption exclusively to this enclave:
// This policy is only an example. Please further tighten the policy
// for production usage.
{
  "Sid": "DenyDecryptUnlessEnclave",
  "Effect": "Deny",
  "Action": "kms:Decrypt",
  ...other configurations...
  "Condition": {
    "StringNotLikeIfExists": {
      "kms:RecipientAttestation:PCR1": "1fbc2d1a9db986da419ea8ad78198be69dc2d829b5f67b4a08746aa934a9f2e3a931ebd1c1082ae6499c44ebba73f003"
    }
  }
},
{
  "Sid": "EnableNitroEnclaveDecryption",
  "Effect": "Allow",
  "Action": "kms:Decrypt",
  ...other configurations...
  "Condition": {
    "StringEqualsIgnoreCase": {
      "kms:RecipientAttestation:PCR1": "1fbc2d1a9db986da419ea8ad78198be69dc2d829b5f67b4a08746aa934a9f2e3a931ebd1c1082ae6499c44ebba73f003"
    }
  }
}
Step 6: Run the enclave
Now that the enclave as access to the data. We can start with the data processing.
nitro-cli run-enclave \
  --eif-path enclave.eif \
  --cpu-count 2 \
  --memory 512 \
  --enclave-cid 16
That’s all folks! We just performed computations on the encrypted data without ever exposing it to any external parties.
Please watch the following video to see it in action.
Conclusion
In this blog, we performed zero‑trust processing of our confidential data, since no data is ever shared in it’s decrypted state with any external party. We’ve simplified regulatory compliance and accelerated time to value.
Hence, encrypting data in‑use with AWS Nitro Enclaves empowers your organization to process sensitive information without ever exposing it, dramatically lowering compliance risk and operational overhead. Whether you’re in finance, healthcare, insurance, or any data‑driven industry, enclaves offer a practical, cloud‑native path to secure collaboration and rapid innovation.
As mentioned before, AWS Nitro Enclaves is a hypervisor layer TEE solution. This requires us to trust Amazon that enclaves are not compromised. Instead, we can move this trust down to the hardware itself and create a TEE inside a processor (CPU/GPU). We will discuss hardware-level TEE in a future blog, please stay tuned.
Now, it is your turn to rethink what’s possible with your most sensitive data. If you need experts to help introduce confidential computing in your infrastructure, please reach out to us at [email protected].